This project will teach you how to decorate an apron using lace, fabric, your machine decorative stitches and applique techniques.
To create this project you can use any style sewing machine. I have used a Brother NV110 sewing machine.
What you will need
Apron
You can sew your own basic apron using the pattern from our May Charity Sewalong. I have purchased this apron from a Daiso Japanese store for only $2.80. You may also be able to find aprons like this from $2 stores across Australia.
Materials
- Download the Applique Shape Patterns (PDF, 400KB)
- Hot Melt Web for the applique
- Range of matching fat quarters for the applique
- Lace style 1 – 2 x width (plus 2 inches) of the bottom of your apron and 1 x the top width (plus 2 inches).
- Lace style 2 – 1 x width (plus 2 inches) of the top of your apron and 1 x the width of the pocket (plus 2 inches)
- Lace style 3 – 1 x width of your pocket (plus 2 inches)
- Fabric – 6 inches x (2 x width (plus 2 inches) of the bottom of your apron and 1 x the top width (plus 2 inches))
How to create your apron
First you need to get together all of your fabric, lace and applique pieces. Start cutting out your applique shapes from the fat quarters. You can choose any colours for these applique shapes but I would suggest you choose a white fabric for the circle and then style your cupcake shapes differently.


Measure and cut out the bottom bits of fabric and lace and ensure you go about 1 inch over each side of your apron. Giving it this extra width means we can tidy it up and create a nice finish later down the track.


Now do the same for the top bits of fabric and lace, ensuring you cut an extra inch at each side of your apron, as shown below.

It’s a good idea at this stage, once you’ve cut out all your bits of fabric and lace to just lay it out on a table and apply all of your bits to the apron where you would like them to go. Once you have done that, take a photo so you know how you want to apply these after all the preparation is done.
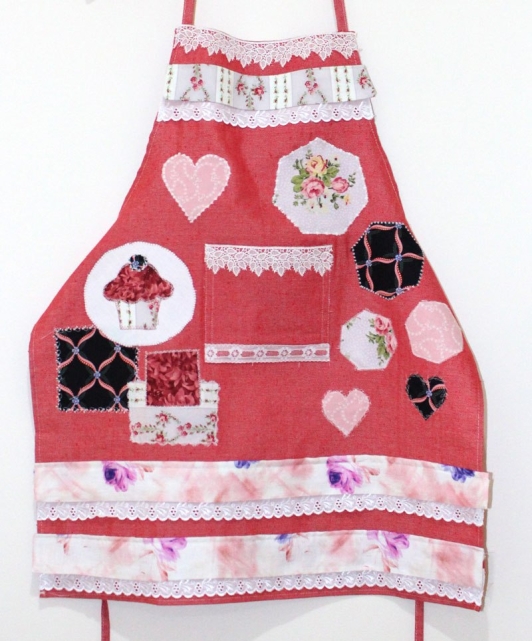
Below is just one idea of what it might looks like but there are plenty of applique pieces there to create your perfect look. I ended up cutting out a few extra hearts and hexagons to get the design below.

You may want to mark with pins where the top and bottom of your fabric strips go so that you leave enough space to place your applique peices.
Prepare your fabric and applique pieces
- Cut out and iron the hot melt web onto your applique pieces.
- Fold your fabric strips in half and iron them down flat.
- Only apply the first lot of applique pieces to your apron where you would like them to go. This means you should not be overlaying or overlapping any of these applique pieces on top of each other.


Sewing your lace and fabric pieces
Now that the fabric applique is stuck onto your apron we can sew the lace and fabric pieces onto your apron.
This technique should apply for all different lace types so you can choose whichever lace style suits your apron. We will tuck under the edges of the lace and pin this down, as shown below.


Sew along these three edges of the lace, as close to the edge as possible to create a nice finish.


Place the fabric strip which will go above your lace onto your apron. If you have this piece of fabric turned out (right sides together) it will be easier to mark with a pin where this extends over the edge of the apron.

Mark with a pin or washable pen and sew along this edge using a straight stitch.


If you have quite a lot of excess fabric you can cut this off then turn your fabric inside out so it’s facing the right way. Iron down flat.

Tidy the frayed edge of your fabric strip with an overlocker or zig-zag stitch. Place your fabric strip above your lace but folded upwards, as shown below. Now pin 1/4 inch along the fabric strip. Once you have pinned this, turn your fabric down to check that it will sit where you want it to go. If it’s too far up or down re-pin as needed.

Now sew 1/4 inch along the edge of your fabric strip, as shown below.

Once you have sewn this down, fold your fabric down and re-pin along this edge. Sew along the edge of this to secure it down. Now iron the fabric down to give it a nice finish.

Repeat this step for the second strip of lace and fabric, which sits just above this.
Decorative-stitch your applique pieces
This is where I’m asking you to get creative with your decorative stitches. You could use a standard blanket or zig-zag stitch to sew your applique pieces on but instead, I want you to test out some of those beautiful decorative stitches that come built-in with your machine.


Now you should have the bottom fabric and lace completed, as well as the first layer of applique.

Now we can iron-on our remaining overlaying pieces of applique fabric for our second round of stitching.

Decorative stitch these pieces down.

Continue to apply your fabric until you have completed all of your applique pieces.


Decorating your pocket
Since I purchased this apron with a pocket already attached, I am going to unpick it with an unpicker tool. If you’re sewing your own apron you can simply cut out a pocket piece of fabric and apply the same techniques.

As shown below, I have stitched on the lace to the top and bottom of my pocket piece using a zip-zag stitch. Make sure you adjust your stitch length and width to make it quite small and stitch down as required from your lace. For example the left lace I have only stitched along the top edge. For the right piece of lace I have stitch down along the top and bottom.


Depending on your lace you can either fold it under at the edge of the pocket, or you can cut it right at the pocket edge and then stitch down the sides to secure all corners of the lace to your pocket piece.
Pin your pocket back onto your apron and then straight stitch your pocket back into place by sewing along the very edge of your pocket to avoid stitching over your beautiful lace.


Stitching the final top lace and fabric
We are going to apply the same technique as we did earlier in this tutorial. You can trim away the excess side of your fabric to run along the edge of your apron. Then tuck the lace fabric under along the three outside edges, as shown below. Stitch this down.


Place your fabric on your apron above it. You can use a pin or marker to create a line along where the apron edge runs. Turn the fabric inside out and stitch these two side edges.


Fold this inside out, iron out flat and then overlock or zig-zag the frayed length to give it a nice finish. Pin this in place, facing upwards above your lace on your apron and then stitch down 1/4 inch along the edge, as shown below.


Once sewn, fold this back down in place, then pin along the top edge. Stitch this down as close to the edge of your fabric to give it a nice finish. Iron down flat.


Now stitch down the very last piece of lace to the top of your apron. You can either fold it under as you did with the lace below it, or you can trim it to the edge of your apron and stitch along all three edges to secure it down. It will just depend on what type of lace you choose for your apron.

I have used a zig-sag stitch and adjusted my length and width to make the stitch smaller.

For this type of lace I ended up trimming the edges and then zig-zag stitched down the side as well, as shown below.


The completes your Shabby Chic Apron!

We hope you have learnt how to create an easy apron using basic sewing, stitching and applique techniques. If you create a Shabby Chic apron of your own, don’t forget to upload it to our Echidna Sewing Community Facebook page.

Would I be able to get a hard copy of this pattern?
LikeLike
Hi Carmen,
You could use the Apron pattern from the May sewalong? The link for that is here: https://echidnasewing.blog/2018/04/30/charity-sewalong-may-2018/
Or would you instead like a copy of the blog post as a printable pdf? Let us know and we will certainly help you out. Feel free to email us at digital@echidnasewing.com.au.
LikeLike